Prog282Final2014
#Prog282 Final Spring 2014
Goals:
- Read in a JSON file called FileList.json)
- Use it as a menu for pulling up other JSON or Markdown documents
- A Position Page with Google Maps view
- A Login with Google page and Accounts view
- An About page
We will define a set of rules or structure for our JSON document that will allow us to use it as a guide, or meta-document, for a page that we show to the user. We read in the JSON document, and then parse it to discover what we want to show to the user. We will call this file MetaDocument.json, or just the meta document.
##Overview
Part of your grade will be a review of how closely you follow the following guidelines:
- Use known Patterns wherever possible.
- Don’t corrupt the patterns. Implement them correctly and don’t modify or corrupt them
- When you can’t wedge your code into a pattern, adhere to SRP and DRY
More discussion of this can be found on Elvenware on the JavaScript Patterns page.
On the meta level, the guiding principles are:
- SRP, the single responsibility principle, that a class should have only one reason to change. For me, this usually means each class is small, and easy to understand.
- DRY: Don’t repeat yourself. Always review your code, looking for parallel sections. If you see two blocks of code that are essentially the same, then merge them into one block of code, and pass in a parameters or implement some other means of sorting out any minor differences there might be between the original two blocks of code.
- Working Software is the measure of Progress. Don’t plan ten steps into the future. Just write the code that works now, and make it as clean and simple as possible.
And of course we should unit test everything as much as possible so we feel confident that our refactorings don’t break our code.
##Expectations
NOTE: To fully understand this section you may need to read it once, then read the next section, called requirements, then come back and read this section again.
To do well on the final, some students will not have to complete all the sections. There are students of varying levels of experience in this course. Everyone is expected to complete certain core features. Others will have to meet differing requirements depending on their experience level.
I reserve the right to fix my own grading criteria while going through the finals. Nevertheless, I think giving a few general guidelines might be helpful. These guidelines will help students focus on realizable goals. Everyone is expected to complete at least part of the final if they want to get a passing grade. However, some students will probably only get confused if they try to complete some of the more difficult sections. They should focus instead on core, category 0, features. If they can complete them, then they should attempt other features.
Consider the following grid:
| Cat | Who |
|---|---|
| 0 | Everyone |
| 1 | Top Performers |
| 2 | Experienced |
| 3 | Experts |
| 4 | Extra Credit |
Key:
- Cat means category and refers to an experience level
- Top performers are those who have only taken 282 from me, but who are good developers and have mastered this material.
- Experienced developers have taken more than one course from me.
- Experts are top performers who have taken multiple courses from me.
Probably you can figure out what category you belong to, but if you have questions, let me know.
It will be difficult, perhaps even impossible, to get above a B without completing at least category 1. To get an A, you need to at least try to complete everything. It may be possible for some students to get a C even if they have only completed FileList.json, address and About.
##Requirements
Before we begin to describing the midterm itself, here are some base line requirements.
There are several main objects you need to show:
| Document or Item | Cat | Has Own Page | Log in | URL | MongoDb | Reader | Display | Bootstrap |
|---|---|---|---|---|---|---|---|---|
| FileList.json | 0 | No | No | NA | No | JsonReader | DisplayFileList | Optional |
| address | 0 | No | No | NA | No | JsonReader | DisplayAddress | Optional |
| documentData | 0 | Optional | No | Document | No | JsonReader | DisplayDocumentData | Optional |
| pictureCaption | 1 | Optional | No | Pictures | No | JsonReader | DisplayPictureCaption | Optional |
| Markdown File | 2 | Optional | Yes | Markdown | Yes | MarkdownReader | MarkShow | Optional |
| HTML View | 3 | Optional | No | HtmlView | Yes | None | NA | Optional |
| Position Map | 2 | Optional | No | Position | No | None | NA | Optional No |
| Login | 3 | Yes | No | Login | No | None | NA | Yes |
| Account Info | 3 | Yes | Yes | Account | No | None | NA | Yes |
| About | 0 | Yes | No | About | No | None | NA | Yes |
| AWS | 0 | NA | NA | NA | NA | NA | NA | NA |
| Upstart | 4 | NA | NA | NA | NA | NA | NA | NA |
| GitHub IO | 1 | NA | NA | NA | NA | NA | NA | NA |
| Bootstrap | 3 | NA | NA | NA | NA | NA | NA | NA |
The Document or Item column specifies the trigger for launching a view. FileList.json should be loaded by default when you start the page. This is sometimes called simply the File List. The next three views are based on document descriptors called address, documentData and pictureCaption. These are custom Json files described below.
Markdown File and HTML View are triggered when you click on a markdown file in the File List. The remaining views are triggered by a the selection of a button and/or hyperlink.
The Has Own Page column specifies whether or not the view for the page must appear in its own page. Some views can appear in place on their own page, and some pages must have their own Jade view and appear under their own URL. For instance, they would appear if you naviagted to localhost:30025:/UserPage.
Log In means the user must be logged in to view the page. If they are not logged in, they should be taken to the login page.
You have a good deal of freedom to implement this as you prefer.
Address
This view displays addresses.
Sample Document
{
    "title": "Presidents01",
    "type": "address",
    "version": "v0.0.1",
    "keywords": "images, shapes",
    "License": "Creative Commons",
    "authorInfo": {
        "name": "Claudio Coder",
        "website": "http://agilemanifesto.org/principles.html",
        "email": "a@b.com"
    },
    "content": {
        "firstName": "George",
        "lastName": "Washington",
        "address": "101 June Street",
        "city": "Bellevue",
        "state": "WA"
    }
}
##DocumentData
Display a set of headings and accompanying paragraphs.
Sample document descriptor:
{
    "title": "Paragraphs01",
    "type": "documentData",
    "version": "v0.0.1",
    "keywords": "images, shapes",
    "License": "Creative Commons",
    "authorInfo": {
        "name": "Claudio Coder",
        "website": "http://agilemanifesto.org/principles.html",
        "email": "a@b.com"
    },
    "content": [
        {
            "title": "Deception01",
            "level": 1,
            "content": "Deception Falls near Stevens Pass."
        },
        {
            "title": "Deception02",
            "level": 2,
            "content": "Deception Falls on Highway 2"
        },
        {
            "title": "Deception03",
            "level": 1,
            "content": "Deception Falls runs high in the spring rains."
        }
    ]
}
##PictureCaption
Display a set of headings, pictures and captions.
Sample Document Descriptor:
{
    "title": "Pictures01",
    "type": "pictureCaption",
    "version": "v0.0.1",
    "keywords": "images, shapes",
    "License": "Creative Commons",
    "authorInfo": {
        "name": "Claudio Coder",
        "website": "http://agilemanifesto.org/principles.html",
        "email": "a@b.com"
    },
    "content": [
        {
            "title": "Deception01",
            "winfile": "C:\\Src\\Git\\Writing\\Data\\Images\\Deception01.jpg",
            "url": "images/Deception01.jpg",
            "caption": "Deception Falls near Stevens Pass"
        },
        {
            "title": "Deception02",
            "winfile": "C:\\Src\\Git\\Writing\\Data\\Images\\Deception02.jpg",
            "url": "images/Deception02.jpg",
            "caption": "Deception Falls on Highway 2"
        },
        {
            "title": "Deception03",
            "winfile": "C:\\Src\\Git\\Writing\\Data\\Images\\Deception03.jpg",
            "url": "images/Deception03.jpg",
            "caption": "Deception Falls runs high in the spring rains."
        }
    ]
}
##Markdown File
When you click on a Markdown file, the file should open in the markdown editor. You should be able to:
- Edit the file
- Save the markdown file in the default location specified in FileList.json
- Save the HTML in your XXX.github.io folder. Push the contents of the folder before submitting this assignment. A link to this site appears on your About page, as explained below.
- When you next load the markdown file back into the editor the changes you made before your last save should persist
- Store the file in the database
- View the HTML stored in the database in the HTML page, as explained below.
- Use the markdown extra syntax for code in three backticks and tables. We reviewed this code, in class, it supports extended markdown syntax.
##HTML View
Place a checkbox on the main page near the file list. The label for the checkbox should read:
- Display HTML from database
If the checkbox is checked, and you click on a markdown file in the FileList, then the HTML for that markdown file should be pulled from the database and displayed in its own page. You can use SetPick and GetPick to store the name of the file to display in the HTML view page. You should have a div or similar control specified in your HtmlView.jade file that will host this html.
NOTE: Because we are using SetPick and GetPick in multiple places, we will probably have to keep them in routes/index.js. This despite what I said in a previous assignment. If you tried to moved them to Markdown.js, you will probably want to move them back.
##Position Page
This is the Position Page from the midterm. The only difference is that you should now display the current position in a Google Map or some other mapping tool of your choice.
LogIn
The login page for Google Passport. The user will use this page to log in via their Google account.
About
This is mostly so that you can make clear to prospective employers or others that you are the author of this web application. You can put whatever you want on the page, but it must include:
- Your name
- A picture of, preferably of yourself
- A link to your github.io account.
Account Info
Display the user name of the current logged in user. You must be signed in to get this information.
Required Libraries
You must use the following libraries in your program.
- Express
- RequireJs
- Jade
- Jasmine
- Passport Signon
###Tests and Maintainence
- grunt jshint
- grunt pretty (jsbeautify and cssbeautify)
- Jasmine Unit tests. You must have at least 30 tests defined.
- Karma must be able to run at least 14 tests. None of these tests should involve calls to the server.
Required Patterns
All of your code, except no more than three lines in Main.js, must be inside a pattern. You must use at least all of the following patterns:
- Factory
- Singleton
- Bridge
- Decorator
- Prototype Inheritance
- Modular pattern
- Observer (PubSub)
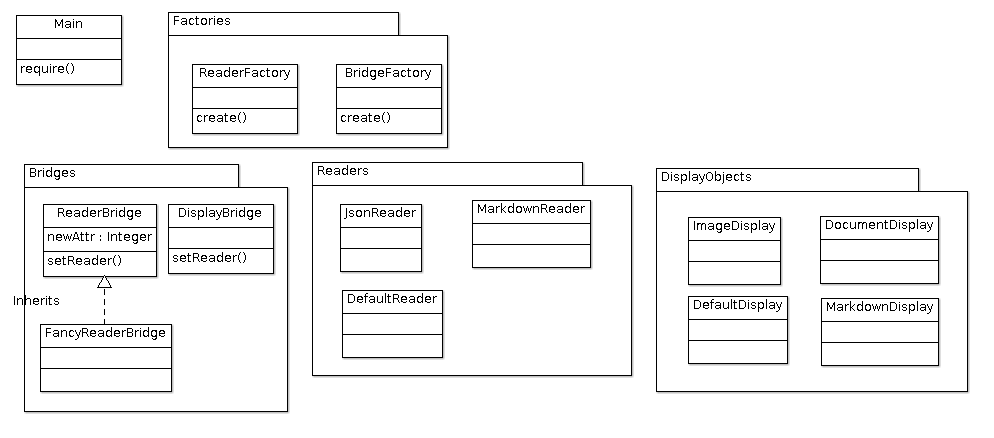
##Objects
Your program will have the following objects in it.
- Main: require bootstrap object
- Factories
- ReaderFactory
- BridgeFactory
- DisplayFactory
- Bridges
- ReaderBridge
- FancyReaderBridge
- Readers
- JSonReader
- MarkdownReader
- DefaultReader
- DisplayObjects
- FileListDisplay
- PictureCaptionDisplay
- DocumentDataDisplay
- AddressDisplay
- Markdown
- MarkShow
- PagedownSetup
- Prettify
- MarkdownEditor
- MarkdownExtra
- MarkdownConverter
- Pages
- index.jade
- Account.jade
- Login.jade
- MapExpress.jade
- Markdown.jade (Optional)
- Misc
- Utilties
- FileTypeSorter
- TinyPubSub
- Special
- .project (Week12Final-LastName)
- GruntFile.js
- karma.conf.js
- package.json
- Tests
- TestMain and MainTest
- Multiple files with tests in them
I’ve included the project file. The point I’m trying to make is that you should include an Eclipse project file with the name field set to Week12Final-LastName, which LastName is your last name.
Your code should be arranged in directories, a bit like this:
public/javascript/Main
public/javascript/Factories/ReaderFactory.js
public/javascript/Factories/BridgeFactory.js
public/javascript/Bridges/ReaderBridge.js
public/javascript/Bridges/FancyReaderBridge.js
etc...
The point is that you create sub-directories for:
- Factories
- Bridges
- Readers
- DisplayObjects
##The Document Descriptor
This document will likely go through multiple iterations over the course of the quarter, but here is what it will look like on the first try. As a Category 2 assignment, the fields in this document should be shown with the help of the FancyBridge object.
{
    "title": "Favorite Shapes",
    "type": "ImageDisplay",
    "version": "v0.0.1",
    "keywords": "images, shapes",
    "license": "Creative Commons",
    "authorInfo": {
        "name": "Claudio Coder",
        "website": "http://agilemanifesto.org/principles.html",
        "email": "a@b.com"
    },
    "content": [
        {
            "title": "Square",
            "image": "Square.png",
            "caption": "Squares are symetrical and have right angles"
        },
        {
            "title": "Circle",
            "image": "Circle.png",
            "caption": "Circles are symetrical and have curves"
        }
    ]
}
To sum up, the main fields should include:
{
    "title": <Title>,
    "type": <MetaDocumentType>,
    "version": <VersionNumber>,
    "authorInfo": <AuthorInfo>,
    "keywords": <Keywords>,
    "copyright": <License>,
    "content": <DocumentObject>
}
You can put other fields in the document if you wish.
###Types
We will be able to define new types as needed. These types are specified in the **
- pictureCaption: Images and captions
- documentData: Captions and text
- address: By default these are our Presidents01.json files. I wanted to have us put these fields in the database. Oh well, some other course….
Two Sections on One Page
Some students have opted to have two sections on the main page:
- FileList.json is display on top
- The selected file is displayed on the bottom
This a good solution. Don’t, however, allow it to be an excuse for having two parallel sets of code in Control.js. That would be a mistake because it likely violates DRY (Don’t repeat yourself). The solution is simple: the same code that displays FileList.json at the top can also display the selected file on the bottom.
Your Document Descriptor, ie in FileList.json and similar files, could include a field called targetDiv. If the user selects FileList.json, then the target DIV as specified in FileList.json is set to topDiv, which is the place in your HTML where you currently display FileList.json. If the users selects some other file, say Presidents01.json, then the targetDiv listed in Presidents01.json is set to bottomDiv, and so the contents of that file displays in the lower part of your main HTML page. Now you can solve the problem with one set of code, rather than two. That one set of code reads the targetDiv to decide where to display the code. Then move all the code that sorts these kinds of things into their own object, something like FileTypeSorter.js, and out of Control.js.
AWS, GitHubIO and Upstart
You should have an instance on AWS that:
- Runs Node
- Supports Git
- Has an elastic IP
- Has ports 22 and 30025 open
Use Git to upload your code. Run your application either as a standard
##Hints
Some hints
###TinyPubSub and jQuery
If you get the “jquery undefined” error with TinyPubSub, try using shim with TinyPubSub. The point is that we have done nothing to make TinyPubSub work with require. That is, we don’t wrap it in a require define function. As a result, we need to shim it into memory.
require.config({
    paths: {
        "jquery": "jquery-2.1.1"
    },
    shim: {
        'TinyPubSub': {
            deps: ['jquery'],
            exports: 'TinyPubSub'
        }
    }
});

require(['TinyPubSub'],

    function(tiny) {
        'use strict';
        console.log("Main called");
###Bootstrap and Markdown
If you want to use bootstrap on your markdown page…
First edit MarkdownLayout.jade to include the bootstrap CSS and a definition for your navigation bar:
doctype html
html
  head
    title= title
    link(rel="stylesheet" href="/stylesheets/bootstrap.min.css")
    link(rel="stylesheet" href="/stylesheets/bootstrap-theme.min.css")
    link(rel='stylesheet', href='/stylesheets/markdown.css')
    link(rel='stylesheet', href='/stylesheets/prettify.css')
    script(src="javascripts/require.js" data-main="javascripts/Main")
  body
    div.navbar.navbar-inverse.navbar-fixed-top(role='navigation')
      div.container
        div.navbar-header
          button.navbar-toggle(type='button', data-toggle='collapse', data-target='.navbar-collapse')
            span.sr-only Toggle navigation
            span.icon-bar
            span.icon-bar
            span.icon-bar
          a.navbar-brand(href='/') Prog282-Calvert

    block content
You can now delete the button that takes you to the home page as the navigator does the job for you. You will, however, find one more small problem: the top of your page disappears underneath the navigation bar. To fix that, you could edit markdown.css to add a little padding at the top of the body:
body
{
	background-color: White;
    font-family: sans-serif;
    padding-top: 50px;
    padding-left: 10px;
}
To spice up the table, you could entirely optionally add a few borders:
td, th {
    border: solid black 1px;
    padding: 3px;
}


th {
    background: #D0FFE0;
}

td {
    background: #D0FFF0;
}

table {
    border: solid black 2px;
    margin: 25px;
}
The end result should be a page with navigation bar, some nicer fonts, and a border around any tables you draw:

###Bootstrap on the Left
Some folks had mentioned that bootstrap is putting the menu in near the middle of the page, that it is not aligned on the left. I put this in style.css and it seemed to help:
.container {
    margin-left: 25px;
}
You can set the left margin closer in if your want. For instance, it could be set to 10px. This changes the location of the container found in these lines from index.jade:
block content
  div.navbar.navbar-inverse.navbar-fixed-top(role='navigation')
    div.container
      div.navbar-header
###Bootstrap Layout in other Pages
Above we put all the code for for the Markdown page in one jade file. But usually we will want to work with a layout.jade where we set the HEAD section for the HTML, and a second page where we define the HTML BODY.
When converting the other pages to support bootstrap, I stuck fairly closely to the original bootstrap assignment. The one change I needed to make was to include a slightly different bootstrap navigation bar in each file. To make that work, I took the definition of the navigation bar out of bootstraplayout.jade:
doctype html
html
  head
    title= title
    link(rel="stylesheet" href="/stylesheets/bootstrap.min.css")
    link(rel="stylesheet" href="/stylesheets/bootstrap-theme.min.css")
    link(rel='stylesheet', href='/stylesheets/style.css')
    script(src="javascripts/require.js" data-main="javascripts/Main")

  body

  block content
Then I included a bootstrap navigation bar definition in each of the pages where I wanted bootstrap to appear:
extends BootStrapLayout

block content
  div.navbar.navbar-inverse.navbar-fixed-top(role='navigation')
    div.container
      div.navbar-header
        button.navbar-toggle(type='button', data-toggle='collapse', data-target='.navbar-collapse')
          span.sr-only Toggle navigation
          span.icon-bar
          span.icon-bar
          span.icon-bar
        a.navbar-brand(href='/') Prog282-Calvert

  h1= title
  p Welcome to #{title}
The bootstrap navigation bar for my main page at this stage looks like this:
extends BootStrapLayout

block content
  div.navbar.navbar-inverse.navbar-fixed-top(role='navigation')
    div.container
      div.navbar-header
        button.navbar-toggle(type='button', data-toggle='collapse', data-target='.navbar-collapse')
          span.sr-only Toggle navigation
          span.icon-bar
          span.icon-bar
          span.icon-bar
        a.navbar-brand(href='/') Prog282-Calvert

      div#bs-example-navbar-collapse-1.collapse.navbar-collapse
        ul.nav.navbar-nav
          li
            a(href='MapDisplay') Map
          li
            a(href='About') About
          li
            a(href='UnitTests') Test
You can change the definition of navbar in each page depending on your needs. With this approach we have bootstraplayout only be concerned with loading the CSS, and leave it up to each page to decide exactly how you want the navigation bar to look.

And though my version of the final is not yet complete, here is at least a sample of what the main page might look like when you click on Presidents01.json:

You don’t have to follow this design. Do what you want, if you need some idea of what pages should look like, here is my map page at this stage. When you click on the map button in the screen shot above, this is what you see. If you click on Prog282-Calvert you go back to the main page, shown above:

###Document Descriptors and the Fancy Bridge
The document descriptors have a number of details that we are supposed to display with the help of the FancyReaderBridge. These include the following fields seen in files such as Presidents01.json and FileList.json:
    "title": "Main File List",
    "type": "fileList",
    "version": "v0.0.1",
    "keywords": "images, shapes",
    "license": "Creative Commons",
The act of displaying this data poses two problems:
- If the FancyReaderBridge is to know about the document descriptor, how will it gain that knowledge. The only objects with any know about these fields are the readers (JsonReader, etc) and display objects (DisplayAddress, etc). How can we get the information to the FancyReaderBridge from these remote outposts?
- The second problem is a more an aesthetic delimna. Is it wrong from the FancyReaderBridge to directly change the user interface?
Let’s begin with the first question. How do we get the information to the FancyReaderBridge? We’ve actually faced this problem before when we had to hook up button response methods to objects on the main page. We solved that problem with the Observer Pattern, with our TinyPubSub class. I think we should do that same thing here. In fact, we can use the same event. When our display object publish a message pageRefresh event, we can tack on the whole document descriptor record:
$.publish('pageRefresh', {
    message: "Refreshed Address",
    serverData: serverData
}
Here serverData is the entire contents of a file such as Presidents01.json or FileList.json. These files include the fields we are interested in such as title, type or keywords.
Then we can have FancyBridgeReader subscribe to the pageRefresh event:
$.subscribe(“pageRefresh”, displayData);
As you recall, the callbacks for these functions look like this:
var displayData = function(event, data) {
	// YOUR CODE HERE
};
So that solves our first problem: how to get data from the display object to the reader bridge. The key point is that we moved the data without ever disrupting the loose coupling in the application. The FancyReaderBridge and the DisplayAddress object still do not know one another in the Biblical sense, and yet they are able to communicate.
This leaves us with the second question: Is it okay for the FancyReaderBridge to directly modify the UI? There are two arguments here that hold weight with me, one from each side of the debate:
- The FancyReaderBridge follows the decorator pattern. As such, it could be argued that it would be okay to modify the bridge pattern with non-bridge-like behavior.
- If we let the FancyReaderBridge modify the UI, how is anyone trying to maintain the app ever going to think to look in FancyReaderBridge.js to solve a UI issue?
I find the first argument mildly compeling, but the second one is, in my opinion, overwhelming. We have a Display directory, and in it are a series of display objects. These objects should, as much as possible, be responsible for handling our display. As a result, the code to update the UI with metadata from our Document Descriptors should be handled in a display object.
So we can create a simple Display Object and put it in the Display folder:
/**
- DisplayMetaData.js */
define(function() {
var DisplayMetaData = (function() {

	function DisplayMetaData() {
	}

	DisplayMetaData.prototype.show = function(serverData) {
	    // YOUR METADATA DISPLAY CODE HERE
	};

	DisplayMetaData.prototype.publish = function(serverData) {
        $.publish('pageRefresh', {
            message: "Refreshed Address",
            serverData: serverData,
            okToDisplay: function(serverData) {
                show(serverData);
            }
        });
    };

	return DisplayMetaData;

}());

return DisplayMetaData;  // require
});
It might make sense to have the display object create the DisplayMetaData object, but still let FancyMetaData make the decision as to whether or not to display it. You could do that like this:
$.publish('pageRefresh', {
    message : "Refreshed Address",
    serverData : serverData,
    okToDisplay: function(serverData) {
        var displayMetaData = new DisplayMetaData();
        displayMetaData.display(serverData);
    }
});
It may not be a perfect solution, but it gets the job done, and it keeps the act of playing with the user interface in the Display directory, where it belongs.
###The Elf and the Map
I declared an elf object public/javascripts:
/**
 * Elf
 */

define(function() {
	'use strict';

	var elf = {
		position : function() {
			elf.displayMap.position();
		}
	};

	return elf;

});
Then in main we need to declare a global instance of elf. This is our only global variable: we are allowed only one!
var elf;

require([ 'bootstrap', 'Elf', 'MarkdownExtra', 'Control', 'MarkShow', 'DisplayMap' ],
	function(bootstrap, elfInit, MarkdownExtra, Control, MarkShow, DisplayMap) {
		'use strict';
		console.log("Main called.");
		prettyPrint();

		elf = elfInit; // We need something in the global space

		$(document).ready(function() {
			if (endsWith(document.URL, "Markdown")) {
				elf.markShow = new MarkShow();
				elf.markShow.getPick();
			}
			if (endsWith(document.URL, "MapDisplay")) {
				elf.displayMap = new DisplayMap();   // elf.displayMap.position is public
			} else {
				elf.control = new Control();
			}
		});
	});
Then you take the code from the Control.js file in the MapExpress example and you put it in DisplayMap.
I believe you can write either this:
var elf = {
	position : function() {
		elf.displayMap.position();
	}
};
or this:
var elf = {
	position : function() {
		this.displayMap.position();
	}
};
We are doing all this work to make this one line which is now in DisplayMap work:
script.src = 'https://maps.googleapis.com/maps/api/js?v=3.exp&callback=elf.position';
This is telling Google maps that the callback method that it can use to reach our code is called elf.position. Of course Google Maps can’t see our private objects, it can only see global objects. So we create one global object, called elf, and we make sure that it has a property called position that points at our code. In effect, elf.position is the entry point, the main for our map object. That is the role it plays in our MapExpress example, so nothing really new is going on here. It’s just that we have to do a little dance to make the elf object global so that Google maps can see it.
Just to review. A key piece of code is this one:
script.src = 'https://maps.googleapis.com/maps/api/js?v=3.exp&callback=elf.position';
Do you see the callback=elf.position at the end of that URL? What we are doing is telling Google that once they have loaded their map for us, they need to call the elf.position method in our code in order to kick of our custom code:
- They set up the map and provide the Map API, the Mapping Web Service
- We call the method in the web service.
The quote unquote “problem” with our code is that we went way out of our way to make sure that we put nothing in the global name space. Our default code leaves 0 footprint. There are no global, public entry points into our code. Which is a very, very good thing – unless someone like Google needs to call one of the methods of our code.
So our goal is to find a way to put something in the global namespace, to intentionally break the rule that we have tried so hard to follow. (Remember, early in the class, I said that we are “allowed” to put one, and only one, variable in the global name space.) So I ask you to declare a variable called elf in the global namespace. Then we point that global variable at our elf object:
elf = elfInit;
Then we set things up so that elf.position points at the the elf.displayMap.position() method. So, we want to fix up the elf code and tie it in with the code that we created in Main:
elf.displayMap = new DisplayMap();
And here is the updated elf object that works with it:
var elf = {
    position : function() {
    elf.displayMap.position();
}
##More on Databases
Folks have pointed out that the code we have now just keeps inserting new data into the database rather than updating a record if it already exists. In other words, we end up with multiple copies of the same record in the database. This is to be expected, since our code is doing an insert each time. The fix, of course, is to do an update rather than an insert.
We are using the MongoClient object from the mongodb package.
var MongoClient = mongodb.MongoClient;
If we dig into the docs a bit we see that there is an optional upsert parameter we passed to update. If we set this to true we can automatically turn an update into an insert if there is no existing record to update. We can also pass in a query parameters that specifies which record we want to update.
Here is the whole function, which you should use to overright the existing QueryMongo.UpdateCollection method:
    // Will create collection if it does not exist, will create record if does
	// not exist. From QueryMongo.js
	QueryMongo.prototype.updateCollection = function(objectToInsert, callback) {
		console.log("QueryMongo.updateCollection called");
		getDatabase(function getCol(database) {
			console.log("In the update callback");
			var collection = database.collection(collectionName);
			collection.update(objectToInsert.query,
				objectToInsert.update,
				{ upsert: true },
				function(err, docs) {
					if (err) {
						throw err;
					}
					if (callClose) {
						closeDatabase();
					}
					console.log("update succeeded");
					callback({
						result : "Success",
						mongoDocument : docs
					});
				}
			);
		});
	};
Notice the first three parameters to the update call:
collection.update(
  objectToInsert.query,    // Query specifying the record to update
  objectToInsert.update,   // The data we want to put in the database
  { upsert: true },        // Do an insert if no data matches our query
  etc...
The first is the query that identifies the record we want to update. The second is the data we want to put in the database, the third is the flag specifying our desire that a record be created if there is none that matches our query.
We can call it from routes/Markdown.js like this:
var markdownData = {
	query : {
		fileName : request.query.fileName
	},
	update : {
		dataType : "BridgeReader",
		markdown : request.query.markdown,
		html : request.query.html,
		fileName : request.query.fileName
	}
};

queryMongo.updateCollection(markdownData, handleSuccess);
Right now I’m specifying all records of this type as having a dataType of BridgeReader. This field allows us to write a query that discovers all the records in the database that were inserted by our program using this technique. Right now my query to discover the record we want to update is simply to use the fileName as a unique string.
Using the fileName as unique identifier is an idea that has numerous holes in it, but I just want to get this hint up here so I’m going with that for now. One possible solution to this issue is to associate a GUID with each record:
https://www.npmjs.org/package/guid
GUIDs]8 are guaranteed to be globally unique throughout the entire universe. How’s that for a claim? I’ll see if I can get that going, but not right now.
##The Config File
We are going to use MongoTalk.config for more than just the database.
{
    "urls": [
        "mongodb://127.0.0.1:27017/test",
        "mongodb://127.0.0.1:27017/bar",
        "mongodb://csc:cscFoiBar2314@ds049848.mongolab.com:49848/elvenlab01"
    ],
    "selectedUrl": 0,
    "bridgeStart": [
        "Documents/Data/FileList.json",
        "Documents/Data/FileListWin.json"
    ],
    "selectedBridgeStart": 0,
    "passport": [
        {
            "returnURL": "http://localhost:30025/Login/auth/google/return",
            "realm": "http://localhost:30025/"
        },
        {
            "returnURL": "http://[ELASTICIP]:30025/Login/auth/google/return",
            "realm": "http://[ELASTICIP]:30025/"
        }
    ],
    "selectedPassport": 0
}
And then load it like this:
router.get('/getConfig', function(request, response) {
	loadConfig(function(configFile) {
		var mongoTalkJson = JSON.parse(configFile);
		var fileList = mongoTalkJson.bridgeStart[mongoTalkJson.selectedBridgeStart];
		console.log("The the fileList URL:" + fileList);
		response.send({fileList: process.env.HOME + path.sep + fileList});
	});
});
Don’t forget to include the following at the top of “routes/index.js”, or “routes/Login.js” or wherever you use loadConfig:
var loadConfig = require('./LoadConfig.js').loadConfig;
And in Control, we have to refactor the constructor to call this new method before we try to load FileList:
 $.getJSON('/getConfig', function(fileList) {
    options.defaultFileName = fileList.fileList;
    run();
});
##Upstart
Some references:
- In JsObjects ExpressSend
- In Elvenwareo NodeJs Page
Here is the line I use to start my app:
exec /usr/bin/nodejs /home/charlie/bin/BridgeReader/bin/www >> /var/log/bridgeReader.log 2>&1
Don’t forget to also change the home directory:
script
    export HOME="/home/ubuntu"
##New Login with OAuth
First install the bearer-http
npm install passport-http-bearer --save
The reference:
And here is the code for routes/index.js or some similar place such as routes/Login.js. Start near the top of the file by linking in Bearer Strategy:
var express = require('express');
var router = express.Router();
var passport = require('passport');
var BearerStrategy = require('passport-http-bearer').Strategy;
Now you are ready to start coding. We begin by simulating two database entries that define a set of default users:
var users = [ {
	id : 1,
	username : 'sue',
	token : '123456789',
	email : 'sue@susan.com'
}, {
	id : 2,
	username : 'paul',
	token : 'abcdefghi',
	email : 'paul@paolo.com'
} ];
The next lines of code give us a way to look up the user in the database. If we get passed a token, which is like a password, we want to confirm that it is associated with a real user. We could, of course, make requirments for passing the test more stringent. For instance, we could ensure that a particular token is associated with a particular email address. Then the user would have to pass in two things: email and token. But for now, we are concerned only with the token:
function findByToken(token, fn) {
	'use strict';
	console.log("find by token called: " + JSON.stringify(token));
	for (var i = 0, len = users.length; i < len; i++) {
		var user = users[i];
		if (user.token === token.token) {
			console.log("token found");
			return fn(null, user);
		}
	}
	return fn(null, null);
}

passport.use(new BearerStrategy(function(token, done) {
	'use strict';
	// User.findOne({
	findByToken({
		token : token
	}, function(err, user) {
		if (err) {
			return done(err);
		}
		if (!user) {
			return done(null, false);
		}
		return done(null, user, {
			scope : 'read'
		});
	});
}));
And finally, here is code to call from the client when we want to authorize a particular user. Again, this is server side code, but this is the method that is called from the client:
router.get('/authorize', passport.authenticate('bearer', {
	session : true
}), function(request, response) {
	'use strict';
	console.log("authorize called");
	console.log(request.user);
	//console.log(request.email);
	// response.redirect('/');
	response.send({'result': 'success'});
});
So you would call it like this from the client side:
var loginClick = function() {
    // '123456789'
    var userInput = $("#userInput").val();
    var token = {access_token: userInput};
    $.getJSON('/Login/authorize', token, function(serverData) {
        console.log(serverData);
    }).error = utilities.handleError;
};
##Server side Errrors
in app.js Express generates this code:
if (app.get('env') === 'development') {
    app.use(function(err, req, res, next) {
        res.status(err.status || 500);
        res.render('error', {
            message: err.message,
            error: err
        });
    });
}
Change it to look like this:
if (app.get('env') === 'development') {
	console.log('env error handler is active');
    app.use(function(err, req, res, next) {
    	console.log('env error thrown');
    	console.error(err);
    	console.error(JSON.stringify(err));
        res.status(err.status || 500);
        res.render('error', {
            message: err.message,
            error: err
        });
    });
}
Now you should get better error messages. You can test it like this:
router.get('/anyRouter', function(request, response) {
    console.log(requester);  // requester doesn't exist, and will throw an exception.
});
The above code should trigger an exception, and cause your newly revamped exception handler to show what it can do.
##HTML Show
- Markdown/MarkHtmlShow.js
##Turn It In
There are three parts:
- Put the assignment in your respository in a folder called Week12Final.
- Leave your app running on Aws, preferrably with upstart.
- On Google Drive provide screenshots and a brief description of your final in a shared folder called Week12Final.
You must provide at least two screenshots, but four or five might be more reasonable. Show your app running on AWS or on your local machine. Describe the level of completeness of your application. Describe which features you completed and which you left undone. If you have known bugs, you can list them.
If you want, you can send me your Mongo config:
"mongodb://USERNAME:PASSWORD@dsXXXX.mongolab.com:XXXX/DATABASE",